I went to meet founders, Jay and Jade Blades earlier this year to find out more about the inspiring work they do (and the gorgeous furniture they pimp). You can read the piece I wrote in the Independent Magazine here. Meanwhile, a few weeks ago, in my Insider column in the Independent on Sunday, I revisited Out of the Dark – to share Jay's tips on restoring a piece of wooden furniture. Now it's time to go in deep. With step-by-step pictures. Over to you Jay...


2. Get all the materials and equipment you need. Including:
Sander - we use Festool sanders (more on sanding at bottom)
Sanding sheets
Masking tape
Primer
Paint
Dust mask
Wet wipes
Varnish
Oil

3. Begin by prepping: glueing, screwing, filling dents, treating woodworm, creating new holes for knobs, removing screws, hinges and handles… Then sand the areas you wish to paint. Ideally first with a sander then go over this by hand.

4. After you mask off any areas you do not wish to paint, paint the primer on.

5. It is always best to use dark coloured primer for areas that will be finished with a dark paint, and white primer for areas that are going to have a light coloured paint.

6. Once the primer has dried, sand it lightly and then paint your first coat of paint. We use water based eggshell paints, mainly from Fired Earth and Dulux.

7. Between each layer of paint sand the painted area down when it is dry. We apply anything between three and five layers of paint.

8. every time you sand the paint between layers, make sure you vacuum the dust up for a smooth finish without bumps.

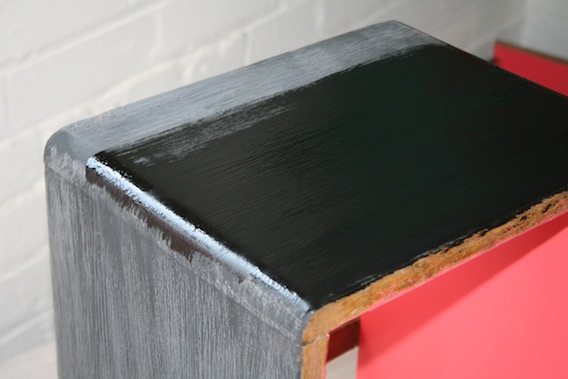
9. When painting, try and make the strokes even, and going from one end to the other on the surface you are painting. If you are painting turned legs, move the brush around their circumference rather than painting vertically, floor to top of the leg: this way you don't get paint build-up.

10. Make sure you follow the drying time specified on the paint tin; this may seem an arduous, long-winded task but it will ensure that your painted surface has less chance of cracking, bubbling and chipping.

11. When you have finished painting, make sure you sand/scrape off any excess paint from areas you might want to keep as natural wood. Then start your varnishing process. We we buy our varnish from Morells, and use: 20% sheen 8203/362b clear; 90% sheen 8901/362b clear; 10 % sheen 8/690130b (black lacquer). But you can buy commercial varnish from your local DIY store as well.
We paint three to five layers of varnish – again make sure you follow the suggested drying times of the brand of varnish you use.

12. The black lacquer varnish we use really makes the black paint stand out
13. Once you have varnished the piece and finished with all your layers, if you have any exposed wood you might want to oil the wood – we use Osmo oil that can be found in specialist hardware stores, or alternatively you can buy Danish oil from a DIY store.

14. The finished result
Here are some more detailed tips from Jay for the serious among you...
What not to restore You’re in a junk shop full of shabby wooden furniture: which pieces are worth the effort? “Avoid anything made after the early 1980s,” says Blades. “Stuff gets flimsy and light. So look at the back – if it’s chipboard, don’t bother. Turn drawers upside down – are they solid? Look at dovetail joints too: many equal machine-made, while few indicate hand-made. Go by weight: heavy usually equals good, solid, old wood.”
Is veneer a no-no? Blades says even the likes of classic mid-century brands such as G-Plan used veneer. “You can’t really sand it though,” he explains, “so just go over it lightly with 400-grit sandpaper, which is very fine. Then oil it: the veneer will come back to life. Never go in with coarse paper.”
To sand or not to sand... Unless you have arms of steel, or a very small piece of furniture – an electric hand sander is best. “We use Festool industrial ones,” says Blades, “but you can buy or hire a small one quite cheaply.” Or… Blades’ top insider’s trick: if you can’t bear all that, buy some chalk paint from anniesloan.com – designed to slap straight on. “It’d even stick to glass,” he says. Though Out of the Dark prefer the long route for perfection.
What to paint Out of the Dark specialise in adding flashes of colour to old pieces – as above – but never at the expense of an expanse of beautiful wood. “We had a stunning Mackintosh desk that was too good to paint,” says Blades. “But we did the insides of the drawers: beautiful.”
Which sandpaper? This is key. 80 removes varnish and paint, 100 and 120 are for post primer, before paint, 240 is for between coats of paint (all three or four of them) and 400 is for just before the final coat of paint and after two coats of varnish on top.
Paint, wax, oil or varnish? Clean thoroughly before you embark on any of these options. And whichever Blades goes for, he always uses water-based options – meaning the piece can easily be returned to its original (and most valuable) state. Treat it as an investment. Oil is good for bare wood – and Blades swears by Osmo Oil, “the results are unreal” he says. Waxing is good over chalk paint, for a shabby chic look. Varnishing is good for a strong finish over painted sections.
Changing handles? Out of the Dark get their replacements from Bombay Duck and Anthropologie. “But keep the originals safe,” tips Blades. “They add to the value.”
See some of Out of the Dark's beautiful furniture in their online shop. They also accept commissions, if you have a piece of furniture that you'd like them to breathe new life into.
See some of Out of the Dark's beautiful furniture in their online shop. They also accept commissions, if you have a piece of furniture that you'd like them to breathe new life into.
Brilliant. Great scheme, and great DIY advice. I'm going to try this out on a couple of things that have pine tops...
ReplyDeleteColumns are frequently used to support beams or arches on which the upper parts of walls or ceilings rest. In architecture, "column" refers to such a structural element that also has certain proportional and decorative features.
ReplyDeleteWood columns
What shade of pink did you use for it? I am planning to repaint our old cabinet and was thinking to paint it pink since my daughter wants it for her room.
ReplyDeletethis is GREAT! As a fellow addict to rehabbing furniture, I am so thrilled to find out I don't have to sand pieces anymore! Eeee! Thank you so much for posting this!
ReplyDeleteBrilliant job! Am going to do this on my chair. Thanks for giving us these types of creative tips.
ReplyDeleteThis comment has been removed by the author.
ReplyDeleteAmazing transformation, you did an amazing job.Luxury Beds and Mattresses
ReplyDeletewonderful job, its really a great job,The online Bed Shop
ReplyDeleteIt is one of the most useful and informative blog I have ever been through. I really loved your work.
ReplyDeleteCheap Furniture Hong Kong | Salvaged Wood Furniture
I have read your post. Informative and interesting which we share with you so i think so it is very useful and knowledgeable. I would like to thank you for the efforts. I am tiring the same best work from me in the future as well.
ReplyDelete